 Supplies Needed:
- 1 large fake pumpkin or ‘funkin’: available at most arts and crafts stores
- 1 base: Any stiff sturdy surface in any shape (wood, chipboard, foamcore)
- selection of sticks ranging in size from twigs to thick wood chunks and root brambles
- variously shaped wood crafting chips available in craft aisles
- acrylic paints in green, light green, dark brown, cream, orange, and yellow
- various glues: craft glue, goop, superglue
- paint brushes: 1 stiff dry brush and 1 soft bristle medium sized flat brush
- paint towels, water cup, plastic cup for mixing spackle mix
- selection of textured rocks no bigger than 1” in diameter
- sand and modeling gravel in various grades (gaming, comic, train and hobby stores)
- paperclay
- modeling flock (fake grass)
- reindeer moss and sponge moss from craft stores
- fake leaves and flowers of choice
- found objects like old keys, buttons, crystals, beads, thimbles, wine corks, marbles, springs
- twine and chain (available in jewelry crafting aisles)
Note about glues: Craft glue works on porous materials like cloth, wood, and cork. You will need goop or liquid nails for metal and plastic items and superglue for the tinier found object details. Sparkle craft glues are also nice to glaze your pumpkin with.
-------------------------------------------------------------------------------------------
 Step #1: Cut the fake pumpkin and base it
I bought my fake pumpkins on sale after Halloween at Michael’s Arts and Crafts. I used a taller pumpkin that is about 11 ½”. There are 2 basic cuts, although you can add more if you want windows or an extra door. First, cut the bottom off so the pumpkin can sit flat on your chosen base. Next, cut a side opening in the pumpkin so you can easily see and decorate inside but not so big that it cuts the pumpkin in half.
It’s ok if the bottom is not perfectly level because you will be ringing it, both inside and out, with rocks, moss, and sticks. This adds natural looking detail as well as further securing the pumpkin to the base with more points of glued contact.
Now, choosing the base. You can just mount your pumpkin on a wood disc that is a bit bigger than the circumference of the gourd. I glued mine onto a pine wood disc that still had bark edging for a more rustic look. These are available at most craft stores. I decided to take it a step further and glue the disc onto a large rectangular board from an old shelving unit so that I could add a walkway and garden area. This all can be as complex or simple as you like.
How to finish the raw edge of your pumpkin’s opening? Lace, sticks, flowers or leaves, stamped paper clay… that’s up to you! I used clay with a sandy textured finish and sparkles.
Note: Keep the cut out pieces of your pumpkin and use for Gazebo roofs later!
------------------------------------------------------------------------------------
 Step #2: Adding wood details
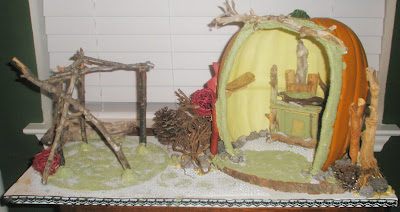
There are many things you can do at this step. You can make steps, a path, and a patio with wooden chips. You can build a gazebo, porch, fencing, or raised garden with sticks. Pine cones can be used like bushes around your pumpkin house. With my pumpkin house, I used dried roots from my lantana plants, potpourri bits, dried bark from mulch, craft chips, and sticks from my oak tree.

First, I built a 3 sided stick frame and let the glue dry. I made a path and a circular patio with variously shaped wood chips. I then put glue on the feet of the stick frame, pushed them into paperclay balls, and then glued these to the base around the patio area. I built the other 2 sides of the stick gazebo right onto this, using the paperclay balls, which air dries, to make the structure sturdy. It’s ok if the glue drips, that can be painted to look like dew or resin later.
I also built a wooden fireplace, a shelf, and added a bit of curving wood across the top of the pumpkin’s entry way. Large roots and gnarled ‘tree’ trunks were placed on either side of the pumpkin and the far corner of the patio area as well.


------------------------------------------------------------------------------------
 Step #3: Applying gravel, stucco, and sand
I glued a ring of lava stone around the inside of the pumpkin’s base. These rocks are light weight, highly textured, and porous enough to stick with basic craft glue. I snitch these from the flower beds of banks and grocery store parking lots, a few at a time!
Next, I mix my basic terrain texturing ‘stucco’. This simulates dirt and worn areas of bare earth so it will be used inside the house and around walkways. The recipe varies a bit based on the surface I’m applying it too. On a wood base I use a whole bottle of acrylic paint (light green or tan), about ¼ cup of craft glue, about ½ cup of sand, and a bit of water until it has a porridge like consistency. Thick but still able to be spread about. You don’t want it runny or the grains will flake off. You also don’t want it too dry or the brush will just clog up. You can use gesso instead of paint or hodge pode collage medium instead of glue but those products are more expensive. Now take this mixture and paint all over the walkway, patio, and floor of your pumpkin house.
Now take your craft glue and make a line between the big rocks and the stucco surface inside the house. Take your medium sized gravel and sprinkle it on, pushing it in a bit with your fingers. Then do the same around some of your patio and path stones and around the legs of your gazebo. This will make a more naturalistic look, blending the textures of large pieces into the ‘dirt’ surface.
While all of this is still wet, sprinkle a bit of fine grain sand all over it, patting it in areas that have glue oozing out. Let all of this thoroughly dry.
-----------------------------------------------------------------------------------------------
 Step #4: Painting the base colors
The Pumpkin:
If you want to change the color or enhance the exterior of your pumpkin, this is the time. You can add warts with clay, stripes, speckles, or vines. You will need to paint the inside of your pumpkin though. I used a deep orange on the outside with red streaks. On the inside I used a mustard color and then worked in a brighter yellow on the large open spaces. Around the fire pit, along the ring of floor rocks, and around the shelf I shaded with a brown.
 The Ground Surfaces:
The floor of the pumpkin, the path, and the patio are all a light green at this point. I painted dark brown around the fire place, the base ring of rocks, and around the patio with more dark areas where rain might drip from the gazebo.

-----------------------------------------------------------------------------------
Step #5: Detail paintingAt this point I use 2 distinct techniques:
-Washing In a little container or flat surface, I mix water and pigment (acrylic or ink) and then wash this over textured surface. This picks up the negative space details and works best by using a color darker or in contrast to the base color. Don’t tip the painted surface until it dries.
 -Dry-Brushing
 Taking a stiffer bristled brush, I will lightly dip it into a paint color that is a bit lighter than the base color. I will brush excess off on a towel if need be. Now I lightly brush in various directions over a textured surface, highlighting raised details.

Note: You will need to do the wash first and let it completely dry before trying to dry brush a lighter color or they will blend into a muddy mess.
On my pumpkin house, I used brown wash all over the interior floor surface and exterior walkways. Then I dry brushed light sage green and cream all over the shelf, ring of floor stones, floor, and fireplace inside the pumpkin. I also dry brushed the exterior wood bits like the gazebo, pine cones, and ‘tree trunks’. This still allowed the natural wood color to show through but tied all of these elements together a bit more and picked up additional wood texturing. I then brushed a clear sparkle glaze all over.
------------------------------------------------------------------------------------
 Step #6: Adding the greenery
Now I glued the flat green reindeer moss on all the negative spaces around the patio and walkway and also around the back of the pumpkin house. I added cream colored spongy craft moss near the root bunch and tree trunk areas. I put a bit of this around the fire place inside too and on the shelf. My pumpkin house is more like a hut open to nature and so green has crept in!

With lines of craft glue, ring some of the stepping stones, around the front of the fireplace, and up on the pumpkin stalk and sprinkle on a bit of the faux grass ’flock’. Fake grass for miniature modeling can be synthetic, dyed sawdust, or made from dyed horse hair. You can find these type of products anywhere that sells gaming or railroad miniatures. Try hobby stores and comic shops.

Now pop in silk and dried flowers, leaves, and nuts as you please! I used potpourri bits, silk flowers, and dried items from my own yard. My gazebo is covered with fall colored leaves and little bits of lavender sprout here and there. You might want a spring time theme with lighter flowers, or a spooky pumpkin with webs and fake spiders… be creative!


--------------------------------------------------------------------------------------
Step #7: The decorating!You are now ready to really have fun and make your pumpkin ready the fairies! The little folk like to ‘borrow’ treasures and so found objects look especially cute. I used copper chain to hang charms and crystals about. I also glued iridescent marbles in niches. I put buttons by the fireplace to be dinner plates and an old key on the shelf to be a platter. A scrap of old cloth and twine became a clothes line. Just look in your junk drawers and use what you have!


Good luck and have fun!

 TeamMIDS has a big PLAN... and it's all about romance!
 -Red hot passion perfume bottles by Enchanticals
 -Heart shaped tuxedo box of chocolates by Jellybeanminis
 -Here is a delicious pink and chocolate tort by MouseMarket
 -A pair of heart pillows by Kibbles
 -The Sweetheart punch bowl set by EverydayGourmet
 -A Candy and Cherry Cake by PetitPlat
 -3 sweet Valentine Pillows by RemarkableCreations
 -Miniature Valentine rose heart by PolkaDotToadstool
 -A lovely red lace doily by Snowfern


.JPG)

.JPG)


.JPG)
